
Build your own mobile beer bar for dispensing kegged home-brew on the go!
(Disclaimer: Don’t break laws; don’t be stupid.)
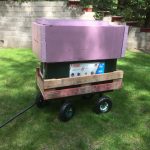
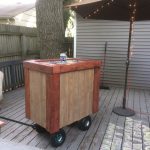
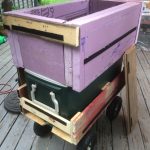
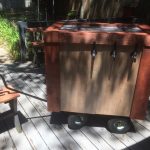
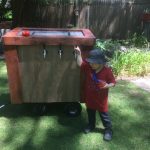
I call it the “Vault.” For the past few years at lawn parties and Pennsic, I’ve had my kegs on ice in a big cooler. It worked, but it burned through ice fast and looked ugly. I’d been considering building a pallet beer bar, but wanted something that would easily break down for transit and easily move around on the deck at home or in camp at Pennsic. Casters on a pallet beer bar seemed like a disaster waiting to happen, so I opted for the sturdy utility wagon. Bonus: when party season is over, the bar completely breaks down and the wagon is entirely useful for gardening and such.
Ingredients:
- 120 quart Coleman Xtreme 6 cooler ($54, Walmart)
- Utility wagon ($61, Amazon — Sandusky Lee CW3418 Muscle Carts Steel Utility Garden Wagon, 400 lb. Load Capacity, 21-3/4″ Height x 34″ Length x 18″ Width)
- Fasade® Traditional 10 – 2′ x 4′ PVC Glue-Up Ceiling Tile, “Galvanized Steel” ($27, Menard’s)
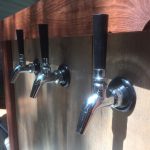
- Intertap Forward Sealing Chrome Plated Faucet, qty. 3 ($19 ea., MoreBeer)
- Beer Faucet Shank – 3.5″, qty. 3 ($20 ea., MoreBeer)
- Faucet Handle, qty. 3 ($2.80 ea., MoreBeer)
- Beer Faucet Wrench ($3.50 ea., MoreBeer)
[an elegant solution to an awkward historical faucet/shank lock design] - Wooden pallet boards
- Miscellaneous plywood and wooden board pieces
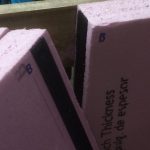
- 2″ FOAMULAR Pink Panther insulation board
- Tarkett Bravado Collection Laminate Flooring, Restored Pine, Caramel, 8 planks ($28, Menard’s)
[I really could have used another couple planks to go fully corner-to-corner, but didn’t want to plunk down another $28 to use only 1/4 of a package] - Lots of wooden boards: 1″x4″ [I used almost 24 feet] and 1″x6″ [I used almost 12 feet]
- Velcro® Brand Combo Industrial Strips Pack – 2″ x 15′, Black [I used maybe 10′]
- Elmer’s Carpenter’s Wood Glue, 8oz ($4.50, Lowe’s)
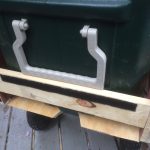
[4oz bottle would have sufficed, but great to have this stuff around] - Vintage kitchen drawer handles from your childhood home, qty. 2
- Nuts, bolts, nails, wood screws
- Angled brackets with wood screws (2)
- Tools: hammer, socket wrench, saw, drill, screwdriver, pliers, scissors, brush, sponge, coarse and fine files,
Step 1: Mash
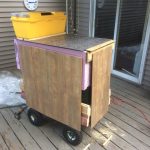
The 120 quart cooler perfectly accommodates 4 five-gallon pin-lock or slimline Torpedo kegs. My keg collection is a mixture of the two. I have only 3 kegs at the moment, but I wanted to make sure I have room to grow. I was hopeful that I could keep the walls on the utility wagon—that the cooler would fit perfectly inside. Unfortunately, that just barely wasn’t the case. If I’d gone with a cooler that only fits 3 kegs, that may have worked. This meant I had to built a cage to contain the cooler. The walls of the utility wagon easily come off by removing pins.
The wagon will need a new floor to rest atop the existing metal mesh floor. I simply used plywood for the new floor. Best to cut too large at first. It’s better to trim it to size later than wish you’d not cut it that much for starters. Since the wagon’s metal mesh floor is sunk below the steel frame, I had to secure some planks of wood to the wagon’s mesh floor to give the new plywood floor something to attached to. No pictures of that, but maybe I’ll add some pics later next time I disassemble the wagon.
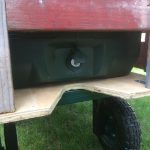
I cut down a pallet to proper size for the long walls. For the front wall, I simply used a 2×4 board to adjoin the side walls and plywood floor. The back wall has to be elevated to leave room for the cooler’s drain hole. I also cut a chunk out of the plywood floor to accommodate the drain water flow.
STEP 2: SPARGE
The 2″ insulation board extends the height of the cooler to accommodate the kegs. Remove the lid from the cooler. No need for it with this build. Fortunately, no irreversible destruction should be necessary. Hopefully your cooler lid simply unscrews with hingers so you can easily reattach it for beach parties.
It was challenging to find the right tool to cut the insulation board. I tried a circular saw, reciprocating saw, and large kitchen knives—serrated and not serrated. The reciprocating saw worked best with the non-serrated knife coming in second, though with much more effort. The latter was great for small adjustments and trimming.
I started with creating double-ply (i.e. 4″) walls all around, but I ended up reducing the front and back walls to single-ply 2″ insulation to align better with the wooden base structure. So, some of these photos do no accurately represent the final version.
Glue easily binds the insulation board to insulation board. Velcro tape is great for adhering together the entire insulation structure. The insulation board is so crumbly that screws don’t reliably bite. Bolts and wide washers would have worked, but that would be a pain for assembly. I wanted to minimize the need for any tools when assembling and disassembling.
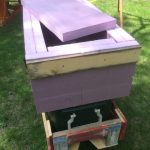
Step 3: Boil
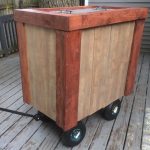
I have a love-hate relationship with the pine laminate flooring. Looks great from a distance. A little plasticy up close. Very heavy. I went with the laminate thinking it would be lighter than wooden boards. Probably about equal.
Velcro tape to adhere laminate boards to sides of insulation board and wooden palette board frame.
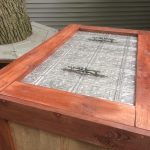
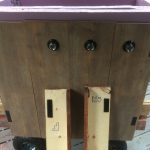
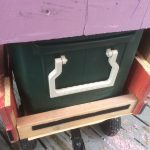
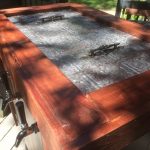
I used crummy plywood/particle board and insulation board for the lid. Glued the faux tin ceiling tile to that, trimmed to fit. Drilled holes through for the lid handles. The screws that came with the handles are very short (for fitting a drawer), so I carved away the insulation board down to the plywood, so the screws would connect through the plywood to the handle fixtures. I had to insert some washers, because the plywood wasn’t thick enough.
STEP 4: Fermentation
The corner boards are 1×4″ and 1×6″. In hindsight, I should have used only 1×6″ so that it would overlap the laminate floor boards more. Some of the 1×4’s just bared connect with the pine laminate boards. I’m getting in the habit of telling people not to examine the beer wagon too closely or else they’ll quickly begin to notice some flaws.
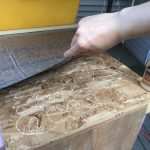
For easy assembly, I found it imperative to label the insulation board pieces, laminate flooring boards, and four corner boards. A simply alphabetic or numeric notation will suffice (A goes to A; B goes to B), but why do that when you could label parts with Egyptian hieroglyphs:
- Connect the Four Sons of Horus to the Four Sons of Horus;
- The Throne of Isis connects to the Throne of Isis;
- Pharaoh meets Pharaoh;
- Henket (beer) joins henket
STEP 5: Kegging
Lastly, of course, a good water sealing of all the boards, just in case that sudden shower catches me off guard. The laminate and particle boards are especially vulnerable to moisture. I’m even thinking of caulking around the lid where the faux tin ceiling tile meets the wooden border.
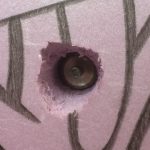
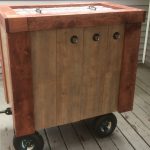
The 1″ drill bit made short work of the laminate floor boards, though they were a lot denser than I had anticipated. Even denser than some wood. I drilled all the way through the insulation board too, of course. That’ll simplify slipping the faucet shanks into place. When installed flush with the pine laminate boarding, the faucets were too closely connecting with the overhanging lid, so I needed to add some additional buffer. I scrounged up a board for the faucet backsplash and painted it with chalkboard paint, so I (and others) can decorate it and, more importantly, label what’s on tap.
Final step: base boards will tidy up the ragged appearance of the pine laminate boarding at the bottom. Unfortunately, I’m out of boards and out of time before Pennsic.
Sundries
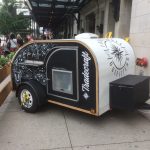
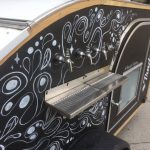
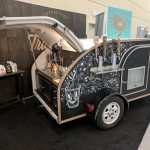
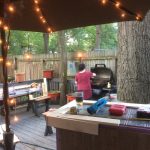
Coincidentally, with my beer wagon on the brain, I spotted this amazing creation in front of the Chicago Athletic Association. It seems to be the creation of Tradecraft Coffee & Tea Outfitters. I dig the whole-wall chalkboard paint. I had considered likewise, but dig the pine board look. The chalkboard-painted faucet backsplash will suffice for me.